
Got your snowboard, got your snowboard bindings, now what? Learn how to set the correct snowboard stance or how to adapt it to your stile of riding! Changing the stance angles, width or setback can make a lot of difference, but there is no right or wrong setup as long as you stay within the limits. What feels best probably works best. Also – I suggest you also read the article about mounting your bindings. There are a few useful tips there will also help you fine tune your stance. OK, now to those annoying details.
Table of Contents
How to set your snowboard stance?
There are three basic measurements you need to decide on when you are playing with your stance:
- stance setback
- stance width
- stance angles
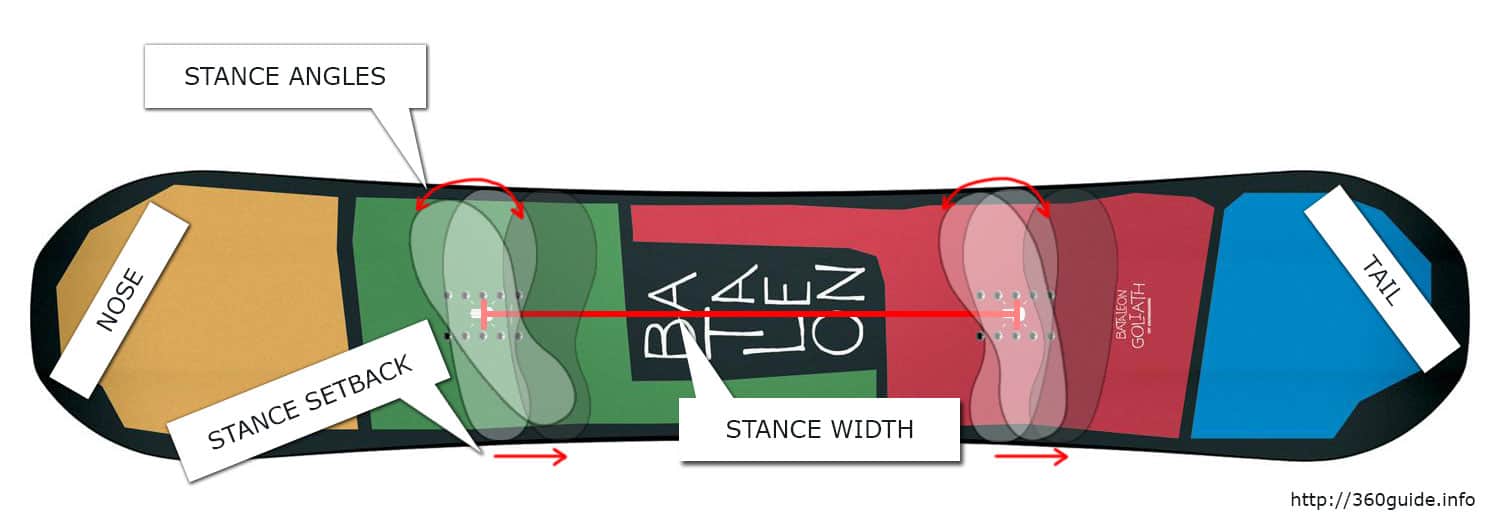
Setback and width are usually set when you mount your bindings and then you usually leave them alone. You can and should play a bit more with your stance angles to find out what feels best for you. Here is a diagram that shows what each of the terms mean:
Setback
What is snowboard stance setback (offset)?
Stance setback is the distance that tells us how far back the center between the bindings is from the center of the snowboard (actually from the effective edge center of the snowboard, nose and tail can be different length, but do not influence the effective edge center of the snowboard).
Are the inserts always in the middle of your board?
Snowboard inserts are two metal pieces integrated into the snowboard that have several holes, which are used for mounting your bindings onto the snowboard. When you mount your bindings you need to know if the inserts already have some setback put in. That means they are not centered in the middle of the snowboard but set a little towards the tail. In this case – even if you put your bindings in the center holes, they will be a little closer to the tail of the snowboard. Insert setback is very common and the amount of setback is related to the type of snowboard (freeride, freestyle…).
Why stance setback?
Standing a bit more towards the back of the snowboard puts more weight on the tail and keeps the nose out of snow. That is a very good idea in deep powder, not so useful in the park. This is why freeride boards have inserts setback and 100% freestyle snowboards do not.
What setback to use?
If you are asking this you should put your bindings in the center holes. Since the insert setback is already integrated into the snowboard you will be just fine. Only if you have some special needs like – you are going to ride really deep and soft powder, then mess with the setback and put your bindings one hole towards the snowboards tail. If you are changing your setback – setback should never be negative (bindings should never be moved towards the nose)!
What Works Where?
- zero stance setback or centered stance – snowboard turns easily and you will have a good board control
- default holes are normally set backward for about 1 inch (or 25mm) – snowboard will behave as if it has a shorter and stiffer tail, you can make more aggressive turns, ollie higher, and float more easily in the powder
- more setback, up to 2 inch setback (50mm) – to ride deep powder in a more relaxed stance without worrying about a nosedive into the deep snow (if you set your bindings too far backwards, snowboard will be harder to turn).
Width
What is snowboard stance width?
It is the distance between the centers of both bindings and it simply tells you how far apart are your feet when you are strapped in. It depends mostly on your height. The width should be roughly equal to the distance from the middle of your kneecap to the ground, or about 1 inch (2.5 cm) more than the width of your shoulders. If you have chosen the right board for your length, then you shouldn’t worry much about the stance width as it should be about the same as distance between the default holes on the board. If you are not an expert snowboarder just let it be.
What Works Where?
It effects your board control and you can feel even small changes that you make to your stance width:
- Wide stance – more stability, harder turn transitions (used more by freestyle snowboarders)
- Narrow stance – less stability, easier turn transitions (used more by freeride snowboarders)
Snowboard Stance Width Chart
Since we are all built differently and have different snowboarding styles it’s IMHO impossible to make exact calculation how wide should your feet be, no snowboard stance width calculator will help you. But for some reference you can use these numbers and then see how it fels:
| height (m) | height (feet) | width (inch) |
|---|---|---|
| < 1.54 | < 5’1″ | 17-18 |
| 1.56 – 1.62 | 5’2″ – 5’4″ | 18-19 |
| 1.65 – 1.72 | 5’5″ – 5’8″ | 19-20 |
| 1.75 – 1.82 | 5’9″ – 6′ | 20-21 |
| > 1.82 | > 6′ | 22-23 |
Stance angles
Am I Regular or Goofy – what is regular and goofy snowboard stance?
If you do not already know, now is the final time to find out what your stance type is. Are you goofy or are you regular. The difference between the two is which leg goes in front. If you put your left foot in front when you go downhill, you are regular and if it is your right foot you are goofy. Most of the snowboarders are regular but that doesn’t mean you are too. Using the right stance type makes it much easier to learn snowboarding.
How Do I Know If I Am Goofy Or Regular?
If you skateboard, wakeboard, surf etc… then you already know your stance, just use the same one for snowboarding. If not – there are a few tests to discover your stance orientation:
- try sliding in your socks over smooth surface, the foot you put in front normally corresponds with your stance,
- borrow a skateboard and try which foot feels better,
- stand on the floor like you are snowboarding and put left foot forward and then right foot forward – imagine that you are riding, what feels better?
- the last and most sure test of your stance type is the first day of snowboarding – try it both ways and you will feel the difference!
Is there a difference between goofy and regular snowboards?
No :)! It’s the same board, you are just standing on it facing the other way.
What are stance angles?
Stance angle is the angle at which the snowboard binding is mounted on to the snowboard. If the binding is totally perpendicular to the snowboard length the angle is zero. If the front of the binding (your toes) is angled towards the nose of the snowboard, you have a positive stance angle and if the front of the binding (your toes) is angled towards the tail, you have a negative stance angle.
Every binding that you buy allows you to set and change your angles.
When we are talking about stance angles they are usually described with two numbers: +24°/+9° for instance. That would mean that the front binding is set at 24 degrees (positive stance angle) and the back binding is set at 9 degrees (also positive stance angle).
Stance angles should be always in sync. If the front angle is bigger then the rear angle should also be bigger and vice versa. Do not make a really big angle difference between both bindings because it will make you stand in an unnatural position and you can damage your knees. The goal is to always put your body and knees in a natural position. Rear angle should never be larger than the front angle! Depending on the angles you have a ref typical stances:
- Alpine stance
- Forward stance
- Duck stance
Alpine Stance
This is a setup used for alpine (or race, or carve) snowboards. These snowboards are so narrow that small stance angles are impossible since your feet will quickly overhang your snowboard and you will wipe out. Front and rear angles are anywhere between +70° and +35° degrees and are usually set by the width of the snowboard. These angles together with hard boots allow you to carve aggressively. For better control in short turns, the difference between the front and rear angle should be at least 5°.
Forward stance
This is the usual stance used by most of snowboarders. Both snowboard bindings have positive stance angles but they are much smaller than with alpine stance. Angles can be smaller because the regular snowboards (freeride and freestyle snowboards) are much wider than race snowboards. Typical angles can vary between +40° and +15° degrees for the front binding and between +30° and 0° degrees for the rear binding.
A general rule is that you should keep the difference between the front and rear angle under 21° degrees. Some typical setups:
- Stance angles: +21° on the front and +6° on the rear – this is a common all-mountain setup,
- Stance angles: +30° on the front and +15° on the rear – this is common setup if you are more carving oriented rider or if you are just starting out (stance for learning how to snowboard).
Duck stance
This is a stance where the front binding angle is positive and the back binding angle is negative. This stance makes your toes face different directions like Donald ducks feet. Duckstance gives you more stability as your body is aligned with the snowboard and is useful for freestyle and riding halfpipe. With duck stance, the front angle is anywhere between 30° and 0° degrees while the rear angle is negative, between -1° and -20°. Keep the angles apart by at least 10 degrees. Typical setups :
- Stance angles: +18° on the front and -6° on the rear – this is more laid back duckstance
- Stance angles: +15° on the front and -15° on the rear – this is 100% (mirror) duckstance.
Toe overhang
Toe (or heel) overhang happens when your snowboard boots hang over the snowboard or better – over the snowboards edge. This must be avoided, because if your boot overhangs the front edge it will come in the contact with the snow when you turn frontside. Your boot will cause the snowboard edge to loose contact with the snow and you will fall on your face. If your overhang is smallish this will only happen with deep carving turns. As readers pointed out – some overhang is absolutely normal and it actually helps with initiating turns. Strap the boots onto the board a see how far you would have to lean to touch the ground with your toes…
To get rid of the overhang you must adjust your stance angles. With the boot centered in a binding, rotate the binding until the boot toe and heel are only a little over the edge of the board. The larger your snowboard boot is, the greater angle you must use. If your feet are really big you should consider buying a wider snowboard. There are special WIDE snowboard models, that are (duh!) wider than regular snowboards and are made for people with big feet.
On the other hand – if your feet are not too big DON’T get a wide snowboard. If your toes and/or heels don’t reach all the way to the edge you will have trouble putting your board on the edge and snowboarding will be really weird and difficult. The same can happen if your stance angles are too big. This is not a common problem since most people don’t want big angles but still – if the angles are too big the boots are inside the edges and you will not be able to put enough pressure on them.
Choosing your stance angle
I’ve said it at the beginning – there is no right or wrong snowboard stance (if you stick to the limits mentioned above). Start with a commonly used stance, bring a screwdriver with you and play with your angles. What feels right usually works.
Oh, one more really important rule.
No Friends On Powder Day Rule
This is a very important rule.
DON’T EVER NEVER NEVER EVER ADJUST YOUR STANCE BEFORE THE FIRST POWDER RUN OF THE DAY WHILE YOUR FRIENDS ARE WAITING!
It’s been snowing whole day and most of the night. You wake up to bluebird skies, grab a bite and run to the mountains. Even though you woke up really early you are surprisingly not the only one with this idea (huh?). To be the first at the top of the hill and draw a line over virgin fresh fluffy powder. You use your elbows to push yourself to the front of the line. Lift opens and you are on the first chair up the mountain. You get off, strap in as quickly as possible and…”Hey, can you wait for me? I just have to adjust my stance for powder…“. It’s your best friend.
Or should I say your ex best friend.
You smile, inhale, and drop in :).
Set you stance at home!
PS: There is also lost of useful info in the comments, read them!:)
PPS: If you like this guide please share it on FB/Twitter etc. Many thanks!